5 Ways to Preserve Food at Home
5 Ways to Preserve Food at Home
It’s the beginning of the year, and I live in Maine. Why am I even thinking about putting up the harvest? Maybe you saw my post about winter gardening and think I’m hauling in bushels of produce. Not quite. Even the kale will be starting to get tough and I think it’s time for me to give up on the garden and let it sleep quietly for a few months. That doesn’t mean I give up on gardening though. Winter is the time to plan your garden and buy seeds. Last year I missed out on some of my favorite varieties and so I ordered most of my seeds yesterday. You can read about that here: http://buying seeds. Let’s look at 5 ways to preserve food at home and why now is the time to think about your harvest.
Weather you grow your food or purchase it from a store, farmer’s market or even a farm share, you are probably reading this because you want to put some of that amazing fresh food away for the winter season. I grow most of my own food but still buy some things. After all, it’s hard to grow lemons in Maine. I also buy some produce and meat from local farms.
The 5 most common ways to preserve food at home are:
- Freezing
- Canning in jars
- Dehydrating
- Fermenting
- Cold Storage/Root Cellar
So why even start thinking about it now when you have months and months left before you put anything up?
TAKE BACK YOUR VITALITY!
Learn more about the health benefits of gardening and get some good tips and instruction too.
Well, fresh produce doesn’t stay fresh very long. And…you might be really busy weeding and harvesting or even purchasing that produce. After all the effort to grow your own food you don’t want to have it rot. At peak availability the delicious produce will come in faster than you can eat it. Don’t wait until it’s all sitting on the counter to decide what to do with it.
I will have more posts with details later but for now think about how you want to preserve your food and start looking for inexpensive ways to get the equipment you are going to need. Buying off season often saves money.
Freezing:
For starters let’s look at freezing. It’s one of the easier methods and does NOT require buying any expensive equipment. Unless, of course you need to buy a freezer. Freezers are pretty expensive. They also cost money to run. I have two of them in addition to the one that is part of the refrigerator. There are pros and cons to storing food this way. I usually only need the extra deep freezer at the end of summer and into winter. I will soon start consolidating everything into just the chest freezer.
Keeping the freezer full is part of reducing cost. Fill plastic jugs with water leaving a couple inches of head space to allow the water to expand, and place in the freezer. If you are thinking of investing in a freezer do some research. Chest freezers cost much less to run because the cold air doesn’t fall out every time you open the door. The down side is that food can be hard to find at the bottom. Having a system of organization helps with either style. I have an upright freezer and a chest freezer. I like them both.
Ok, other than a freezer what do you need? Not much more than is probably already in your kitchen. You will need a large pot to blanch the food in. I’ll have more details later but a pot the size you might boil spaghetti in will do just fine. Next you will need to be able to quickly drain the water thus a colander comes in handy. And last some freezer containers or bags. I use the bags. I start buying the freezer bags well ahead of time. If I expect to harvest greens or strawberries in June, I plan to buy enough bags in April and May. Buying what I know I will need ahead of time makes the process really smooth.
The basic equipment you will need:
- Freezer space
- A large pot
- Colander
- Freezer Containers/Bags and something to label them with like a Sharpie
I’m still using plastic freezer bags (like ziplock). I bought some silicone bags with high high hopes of using something sustainable and space efficient. Nothing sticks to silicone, which is great if you are baking. It’s not so great if you are trying to label the bag….Since I haven’t figured out a way to label the bags with at least a date and contents, I’m still using plastic.
Canning in jars
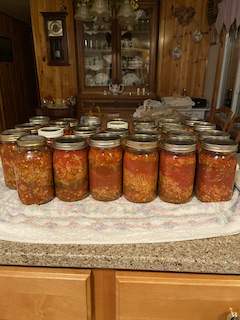
Canning is aa great option if you grow a lot of food and want to store it in a way that does not depend on electricity, and want a quick, convenient way to access the final product.
Canning may be the best way to do this. There is more work up front than freezing, but you don’t have to pay to run the freezer or worry if the power goes out. And…you don’t have to thaw out the food before using it. That’s a plus right there.
Right away you need to know there are 2 different types of canners: water bath and pressure. (I don’t think steam canning or oven canning is safe.)
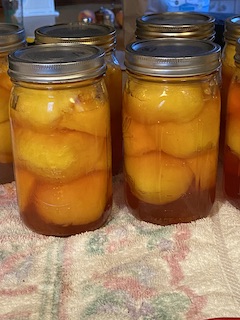
Water bath canners are pretty inexpensive. Sometimes they can be purchased used. The idea is that food is packed in canning jars with canning lids and the jars in the canner are covered with water and boiled for a specified amount of time. Foods that do well in a water bath are usually the “high acid” foods like fruits, juices, pickles and jams. Water bath canning is really easy and a good place to start if you are new to canning.
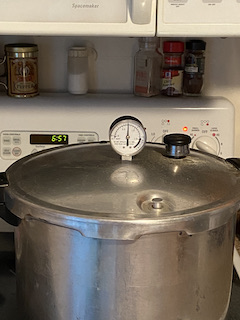
Pressure canners are more expensive but allow you to can “low acid foods” such as green beans, meat, carrots, spaghetti sauce and tomatoes. Older recipe books will give directions for canning tomatoes in a water bath but it’s now considered unsafe. Even heirloom varieties of tomatoes have inconsistently safe levels of acidity for waterbacth canning. Pressure canners use a lot less water and have short processing times but need time to come up to pressure and cool back down.
Don’t let the “pressure canner stories” scare you. The process is very safe if you follow directions and don’t leave the canner unattended. There are even electric canners. These work like an instant pot. You set the pressure and time and it does the rest.
You will also need canning jars which are sometimes called Mason Jars or Ball Jars. I’ve found some great deals at yard sales and estate sales. Check the jars for cracks or chips. There are 2 piece lids to go with the jars. The rings are reusable but the “flat” isn’t unless specified. Right now the “flat” lids are selling for 30 cents or so apiece and come in boxes of 12.
I decided to invest in some reusable lids. It just makes more sense to be able to use them more than once. I bought Tattler lids (200 of them actually), and I really like them. They are easy to use and sealed just as well ads the Ball brand lids. Here is a link.
Canning requires safe recipes. The Ball Book of Canning is the gold standard, but I really like The Encyclopedia of Country Living by Carla Emery.
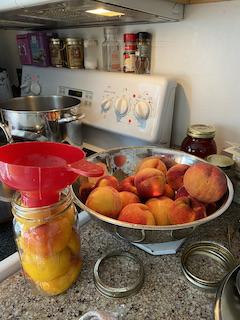
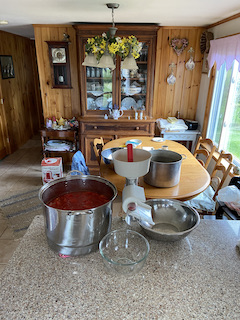
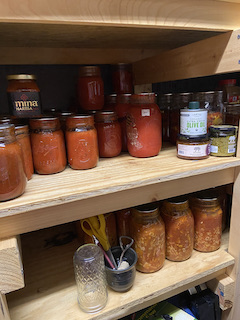
A special funnel for canning jars makes filling them easier and cleaner. You can see my red funnel in the photo above with the peaches.
There is also a jar lifter that makes getting hot jars out of the canner much easier. I canned for many years without either of these but they are very very helpful.
Below is a picture of a Victorio tomato strainer and the pots of tomato juice that will be turned into yummy sauce and soup. I canned for many years without the hand crank strainer that clamps to the counter, but it saves a lot of time.
Dehydrating
Dehydrating is pretty simple. You really will need a dehydrator unless you live in an arid climate. There are old-time methods of drying in the attic or on screens outside. I have made a few attempts at these and gave up. The only things I have dried without a dehydrator are herbs. Those are easy: cut and tie in small bunches and hang them up. They will dry fine. I have done jalapeño peppers this way as well. Apples can be cut into rings and hung near a wood stove. Since they ripen in the cooler weather this works pretty well.
Having said that, all of the onions, sweet peppers, leeks, tomatoes, fruit and even cabbage I have dried was done in a dehydrator. I have an old, small Mr. Coffee Dehydrator that is not available any more. Similar items are available on Amazon and other stores. They run around $50-75 and work well. I also have a Cabella’s large square model with all the bells and whistles. I bought it used. The smaller models work well and the only reasons for investing more money would be if you expect to make a lot of meat jerky or to dry a large quantity at once.
Once the food is dried it needs to be packed in an airtight container. No storage problems unless it gets damp. food does lose some nutritional value and it will taste different once it’s dry. Tomatoes and fruits taste sweeter. Carrots and peppers lose some flavor. Since food shrinks as it loses water, dehydrated food takes up very little storage room.
Fermentation
This is another easy method of preserving food at home. Think of sauerkraut. Basically food is salted and packed pretty tightly into a crock or glass container/jar where it ferments. This can be done with a variety of foods and I hope to share some of my favorites soon.
Cold Storage/Root Cellar
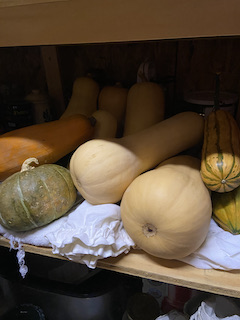
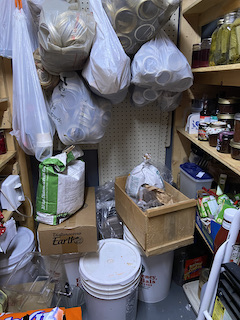
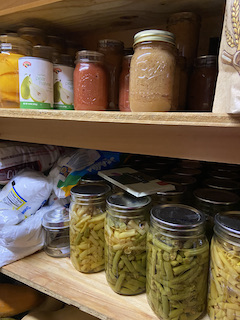
Root crops, squash, pumpkins, apples, cabbage and rutabagas can be stored in a cold, dry room such as a cold room or root cellar. I use a back corner of my cellar. The area is walled off and has a heavy wool curtain for a door. My best cellar storage was when we lived in an old farm house with an unheated cellar. There I was able to pack carrots (tops cut off to about an inch) into sand in a clean trash barrel. They kept all year and even started to grow tops in the spring. In my current situation, I can still keep crops pretty well for the winter. Don’t lay your produce directly on cement or it will spoil. My pantry isn’t particularly tidy but I’ll let you see it anyway. It looks like this:
Some Final Tips
Those are the very most basics of the 5 ways to preserve food at home.
So NOW is the time to be thinking about your harvest:
Besides the Ball Book of Canning, I highly recommend Carla Emery’s The Encyclopedia of Country Living which can be found at Amazon or other book sellers.
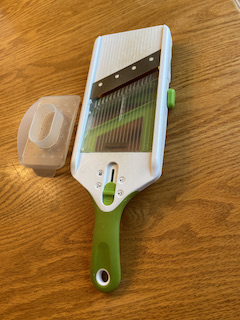
I also love my mandolin slicer and my food processor. The food processor is super old and I know there are some wonderful models available, but there is nothing wrong with the one I have from the ’80’s really. I’m a tightwad I guess, plus I can’t see tossing out yet another item into the landfill. If you are not familiar with a mandolin slicer it looks like this and it’s a lot simpler to clean than a processor.
Now is the time to think about What food you will want to put up. Hint: storing food you never eat only to throw out later, isn’t very much fun. Start looking for what you need for equipment and some great books. Keep it simple and look for second hand options.

4 Comments